Before you begin
- You hold workspace admin access for the workspace you are adding to.
- The person's email domain is routed to the enterprise.
- You know the workspace persona they need.
- You know which SOCK role they need — Consumer is read-only; Creator and Custodian can build and release, and can publish where distribution policy permits it.
- You know whether they should also administer the workspace.
Open the Admin Console
- 01
Open the launcher
Sign in to MSOCK and open the launcher for the workspace you administer.
- 02
Choose Admin Console
The chip sits at the top-right of the launcher for anyone with an administration role. The console opens at the scope your role permits.
- 03
Confirm the workspace
Check that the workspace you intend to change is the one selected.
- 04
Open Users
On the workspace page, select the Users tab beside Distribution.
Add one person
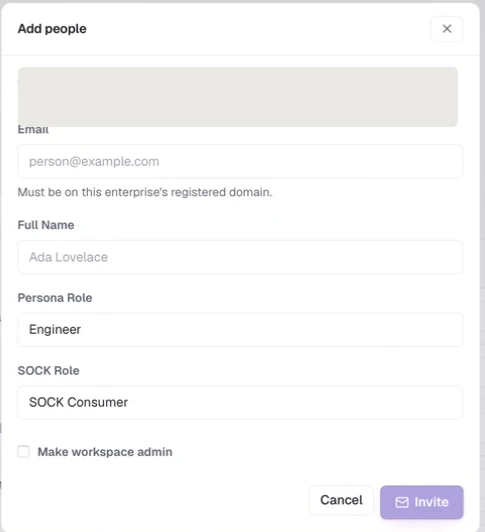
The dialog assigns workspace persona, SOCK access, and optional workspace-administrator authority in one place. Workspace identity is removed; the visible values are placeholders or generic role examples.
- 01
Choose Add people
From the Users tab, open the Add people dialog.
- 02
Enter the email
Start typing. MSOCK suggests people who already exist in the enterprise directory, so you can add an existing colleague instead of creating a duplicate. The domain must be registered to the enterprise.
- 03
Enter the full name
MSOCK proposes a name from the email's local part; edit it freely.
- 04
Choose the Persona Role
Pick the persona matching their responsibilities: Engineer, Capability Lead, Guild, Product, QA, Security, Release Manager, or Leader.
- 05
Choose the SOCK Role
Pick SOCK Consumer for read-only access, or SOCK Creator / SOCK Knowledge Custodian for someone who will build and release knowledge. Team publishing also depends on workspace provisioning and distribution policy.
- 06
Decide on admin access
Select Make workspace admin only if the person should administer this workspace and add other people.
- 07
Submit
The button reads Invite for a brand-new person, Add for someone already in the enterprise, and Update when you are only changing the grant of an existing member.
Add several people at once
For a larger group, use Bulk add people and upload a .csv file. Each row is reported back individually as Invited, Added, Already a member, or Failed, so a partial success is visible rather than hidden.
Verify activation
A new member appears as Invited immediately. Ask them to sign in with the exact email address you used. Their status changes to Active after the first successful sign-in; there is no separate acceptance link.
If adding someone fails
| Problem | What to check |
|---|---|
| The domain is rejected | The email domain must be routed to the enterprise; correct routing first rather than retrying |
| The person already exists | Use the suggestion in the email field, or the Update path |
| They cannot sign in | Confirm the exact address, the workspace, and that enterprise sign-in is configured |
| They see locked tiles | Workspace setup has not completed — see set up a workspace |
| They cannot create a SOCK harness | Their SOCK role is Consumer; change it to Creator or Custodian |